Flowbite is an open-source library of UI components based on the utility-first Tailwind CSS framework featuring dark mode support, a Figma design system, templates, and more.
It provides prebuilt components that we can import and use in our projects. Flowbite is supported in most of the web frameworks or libraries like, React, Next js, Angular, Laravel, Remix Gatsby, Astro, Vue.js, Svelte, etc.
All of the elements are built using the utility classes from Tailwind CSS and vanilla JavaScript with support for TypeScript.
For React and React-based frameworks, there is a specific NPM package called flowbite-react that can be used in all React-based frameworks like React JS, Nextjs, Remix, and Gatsby.
Now there might be two scenarios where you would want to use Flowbite in Nextjs
- You want to create a new Nextjs application and set Flowbite in that
- You have an existing Nextjs project in which you want to set Flowbite
Method 1: Using Flowbite in the new Next js app
If you want to create a new Nextjs application and set up Flowbite it, then I have good news for you.
You can use the Flowbite CLI tool to create a Next js project which will be already setup with Tailwind CSS and Flowbite.
Just run the following command in your terminal and follow the prompts
npm create flowbite-react@latest
Or you can skip the prompts by passing the command line arguments in the command like this
create-flowbite-react <project-directory> [options]For example
npm create flowbite-react@latest my-app -- --template nextjsThis command is going to create a Nextjs project named my-app with Flowbite already setup in it.
Now we just need to navigate to the project by writing cd my-app in the terminal and Install all the dependencies by running npm install.
Once everything is installed you can run npm run dev to run and check your application in the browser.
Method 2: Setup Flowbite in the existing Nextjs app
Well if you want to use Flowbite in your existing Nextjs application you need to follow the following steps:
Setup Tailwind CSS
1. Install tailwindcss and its peer dependencies:
npm i -D tailwindcss postcss autoprefixer2. Generate tailwind.config.js and postcss.config.js files:
npx tailwindcss init -p3. Add the paths to all of your template files in your tailwind.config.js file:
/** @type {import('tailwindcss').Config} */
module.exports = {
  content: [
    "./app/**/*.{js,ts,jsx,tsx,mdx}",
    "./pages/**/*.{js,ts,jsx,tsx,mdx}",
    "./components/**/*.{js,ts,jsx,tsx,mdx}",

    // Or if using `src` directory:
    "./src/**/*.{js,ts,jsx,tsx,mdx}",
  ],
  theme: {
    extend: {},
  },
  plugins: [],
};
4. Add the @tailwind directives for each of Tailwind’s layers to your globals.css file:
@tailwind base;
@tailwind components;
@tailwind utilities;
Setup Flowbite by installing flowbite-react
1. Run the following command to install flowbite-react:
npm i flowbite-react2. Add the Flowbite React content path and plugin to tailwind.config.js:
const flowbite = require("flowbite-react/tailwind");
/** @type {import('tailwindcss').Config} */

module.exports = {
  content: [
    "./app/**/*.{js,ts,jsx,tsx,mdx}",
    "./pages/**/*.{js,ts,jsx,tsx,mdx}",
    "./components/**/*.{js,ts,jsx,tsx,mdx}",

    // Or if using `src` directory:
    "./src/**/*.{js,ts,jsx,tsx,mdx}",

    flowbite.content(),
  ],
  theme: {
    extend: {
      colors: {
        background: "var(--background)",
        foreground: "var(--foreground)",
      },

    },
  },
  plugins: [flowbite.plugin(),],

};
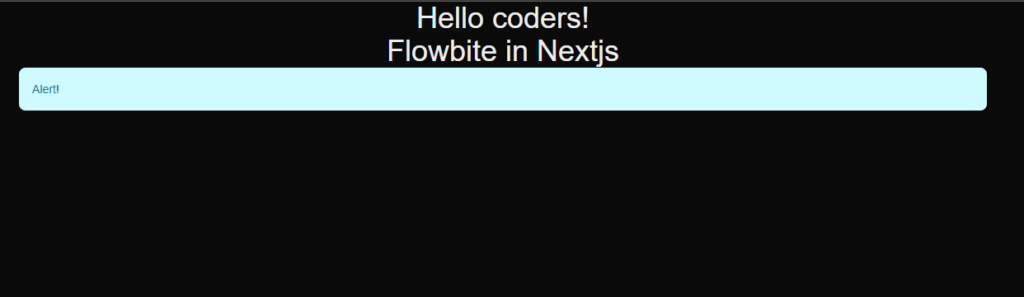
Now that you have successfully installed Flowbite React you can start using the components from the library.
3. Using Flowbite components
import { Alert } from "flowbite-react";

export default function Home() {
  return (
   <div className="main text-center">
    <h1 className="text-4xl"> Hello coders!</h1>
    <h2 className="text-4xl"> Flowbite in Nextjs</h2>

    <Alert color="info">Alert!</Alert>
   </div>
  );
}
Output
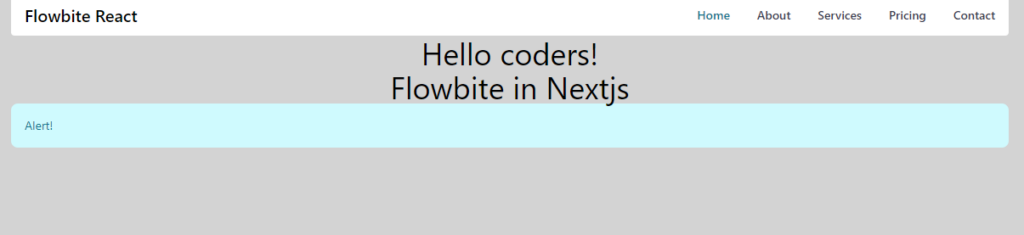
Let’s use another component, this time we are going to use Navbar
If you want to use Navbar then you have to import it using
import { Navbar } from "flowbite-react";But you can use this in client components only, like below
"use client";

import Link from "next/link";

import { Alert, Navbar } from "flowbite-react";

export default function Home() {
  return (
   <div className="mx-24 text-center">
    <Navbar fluid rounded>
      <Navbar.Brand as={Link} href="https://flowbite-react.com">
        {/* <img src="/favicon.svg" className="mr-3 h-6 sm:h-9" alt="Flowbite React Logo" /> */}
        <span className="self-center whitespace-nowrap text-xl font-semibold dark:text-white">Flowbite React</span>
      </Navbar.Brand>
      <Navbar.Toggle />
      <Navbar.Collapse>
        <Navbar.Link href="#" active>
          Home
        </Navbar.Link>
        <Navbar.Link as={Link} href="#">
          About
        </Navbar.Link>
        <Navbar.Link href="#">Services</Navbar.Link>
        <Navbar.Link href="#">Pricing</Navbar.Link>
        <Navbar.Link href="#">Contact</Navbar.Link>
      </Navbar.Collapse>
    </Navbar>
    <h1 className="text-4xl"> Hello coders!</h1>
    <h2 className="text-4xl"> Flowbite in Nextjs</h2>

    <Alert color="info">Alert!</Alert>
   </div>
  );
}
Output
Simillarly we can use all the components available on flowbite-react .
Conclusion
I hope now you know how to use flowbite-react in your Next.js applications, you can always visit to official documentation for more detailed guides and see list of components available.
Thanks for visiting tutorend.com 🙂