GitHub Actions is a CI/CD tool built into GitHub. It can be used to automate tasks such as testing, building, and deploying code when specific events occur (e.g., push, pull request, release) in your repository.
There are four components of GitHub Actions
- GitHub Action Workflows
- Events
- Jobs
- Actions
- Runners
You can configure a GitHub Actions workflow to trigger on events like pull requests or issue creation. A workflow includes one or more jobs, which run on a runner—a virtual machine or container. Each job consists of steps that run scripts or an action, which is a reusable component that simplifies your workflow.
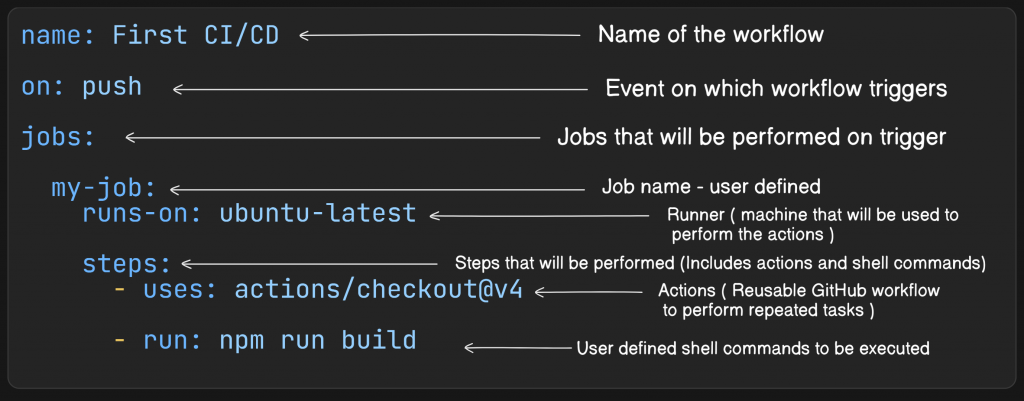
The above diagram shows the basic structure of a GitHub Action Workflow file.
Basic Example of GitHub Action
name: CI/CD Project

on: [push]

jobs:
  build:
    runs-on: ubuntu-latest

    steps:
      - name: Checkout code
        uses: actions/checkout@v4

      - name: Set up Node.js
        uses: actions/setup-node@v4
        with:
          node-version: '22.x'

      - name: Install dependencies
        run: npm install

      - name: Run build
        run: npm build
What this does:
- Runs on every push to the repository
- Uses Ubuntu virtual machine
- Checks out the code
- Sets up Node.js
- Installs dependencies and builds app
Now, let’s understand each GitHub Action concept
1. Workflows
A workflow is the top-level definition of automation in GitHub Actions. It’s a YAML file located in the .github/workflows/ directory of your repository. Each workflow defines what should happen when a specific event occurs (like pushing code, creating a pull request, etc.).
You can have multiple workflow files in a project—for example, one for testing, another for deployment.
Example filenames:
.github/workflows/test.yml.github/workflows/deploy.yml
Each workflow can run one or more jobs either in sequence or in parallel.
Key parts of a workflow file:
- name: Human-readable name for the workflow
- on: Event trigger (like push, pull_request)
- jobs: A list of jobs that define what to do
2. Events
Events are specific GitHub activities that trigger workflows. You define these under the on: keyword in your workflow file.
Common examples:
- push – Triggers when someone pushes code
- pull_request – Triggers when a pull request is opened, updated, or merged
- workflow_dispatch – Allows manual triggering via the GitHub UI
- schedule – Allows running on a schedule using cron syntax
Example:
on:
  push:
    branches: [main]
This means the workflow runs every time code is pushed to the main branch.
3. Jobs
A job is a set of steps that execute on the same runner. Each workflow can include one or more jobs, and by default, jobs run in parallel.
Jobs contain:
- A name
- The type of runner to use (e.g., ubuntu-latest)
- A sequence of steps (commands or reusable actions)
You can also make jobs run sequentially by using the needs: keyword to create dependencies between jobs.
Example:
jobs:
  build:
    runs-on: ubuntu-latest
    steps:
      - run: echo "Building..."

  test:
    needs: build
    runs-on: ubuntu-latest
    steps:
      - run: echo "Testing..."
In this case, the test job runs only after the build job completes.
4. Actions
Actions are reusable pieces of code that automate specific tasks. You can think of them as packaged scripts maintained by GitHub or the community. Instead of writing everything from scratch, you can use or create actions.
There are three types of actions:
- Docker container actions
- JavaScript actions
- Composite actions (group of other steps/actions)
Example (using a public action):
- name: Checkout repository
  uses: actions/checkout@v4
You can also write your custom action for reuse across projects.
GitHub maintains a marketplace of actions here: https://github.com/marketplace?type=actions
5. Runners
A runner is a server that executes your workflow’s jobs. It listens for available jobs and runs them when triggered. GitHub provides hosted runners for popular operating systems, but you can also host your own runner.
Common runner environments:
- ubuntu-latest
- windows-latest
- macos-latest
Example:
runs-on: ubuntu-latestGitHub-hosted runners come pre-installed with many tools (like Node.js, Python, Docker, etc.), which makes setup easier.
You can also self-host a runner if you need more control over the environment or need to use private resources.
You’re right — after explaining the core concepts, the next logical section in your article should be: “How to Configure a GitHub Action in Your Project.” This is where you guide the reader step by step to actually write and set up their first workflow file. Here’s how you can write that section:
How to Configure a GitHub Action in Your Project
Now that we understand the basic building blocks of GitHub Actions — Workflows, Events, Jobs, Actions, and Runners — let’s walk through how to set up a GitHub Action in a real project.
Lets see how to:
- Set up the required folder structure
- Create a simple workflow that runs on every push
- Install dependencies and run tests
Step 1: Create the Workflow Directory
Inside the root of your GitHub repository, create the following folder and file structure:
.github/workflows/ci.yml
In a terminal:
mkdir -p .github/workflows
touch .github/workflows/ci.yml
This is where GitHub looks for workflow definitions.
Step 2: Write Your First Workflow
Open the ci.yml file and paste the following example:
name: Basic CI for Node.js

on: [push]  # Trigger on every push

jobs:
  build:
    runs-on: ubuntu-latest  # Use Ubuntu runner

    steps:
      - name: Checkout code
        uses: actions/checkout@v4

      - name: Set up Node.js
        uses: actions/setup-node@v4
        with:
          node-version: '18'

      - name: Install dependencies
        run: npm install

      - name: Run tests
        run: npm test
Let’s break this down:
- name: Gives your workflow a name
- on: Specifies the event that triggers the workflow (here, it’s any push)
- jobs: Contains one or more jobs (we have one job: build)
- runs-on: Tells GitHub to run this job on Ubuntu
- steps: List of actions or shell commands to execute
Step 3: Push and Watch it Run
Commit your changes and push to your GitHub repository:
git add .
git commit -m "Add basic CI workflow"
git push origin main
Then go to your GitHub repository:
- Click the “Actions” tab
- You’ll see your workflow running under the name “Basic CI for Node.js”
- Click into it to see real-time logs
Step 4: Modify or Add More Workflows
You can:
- Create separate workflows for test, build, deploy
- Use conditions (like run on pull_request instead of push)
- Add caching, parallel jobs, custom environments, secrets, etc.
For example, to run only on main branch pushes:
on:
  push:
    branches: [main]